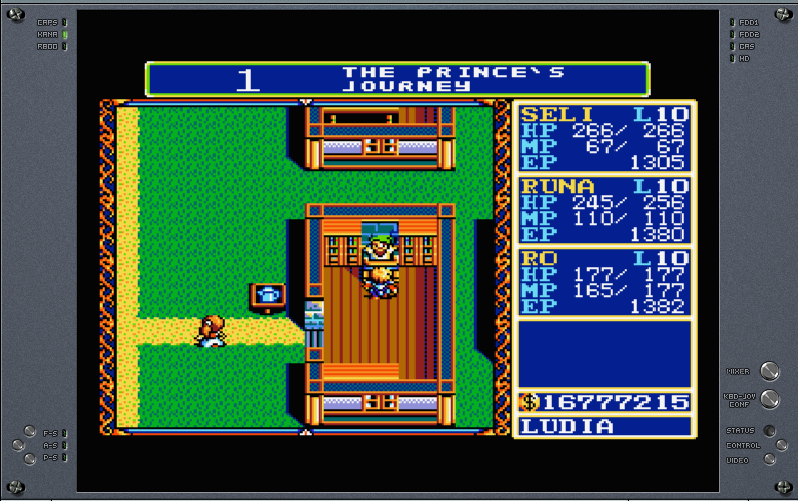
Categorie: Code analysis dragonslayer 6

Part 8: A backdoor to get killed

How much damage?

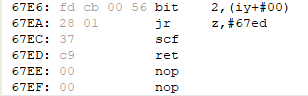
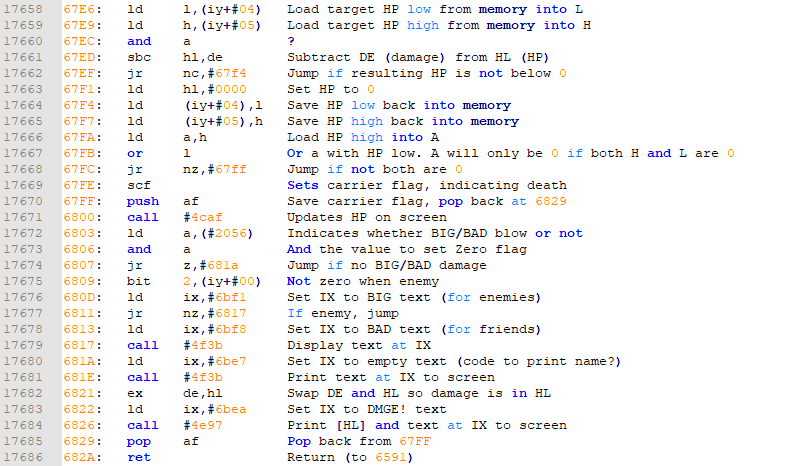
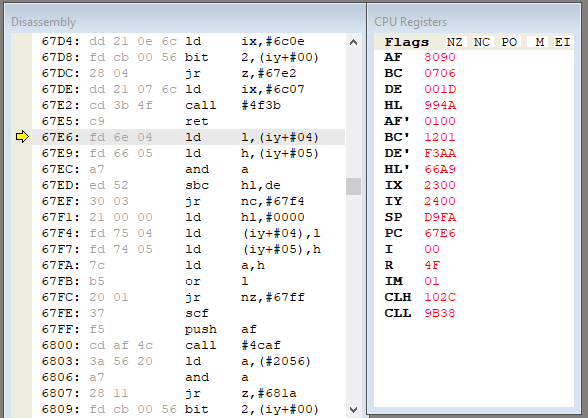
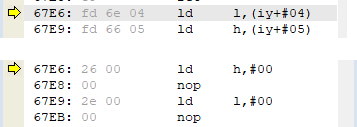
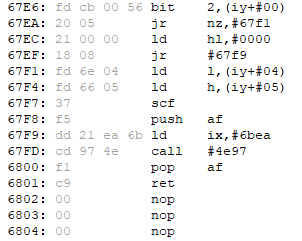
So in the previous post, we created our cheat to make us invincible. To make the cheat a little more sophisticated and show the damage done, we could write the instructions like in the following image. I will not explain what the code does. If you have read the previous posts, you must be able to figure this out yourself.
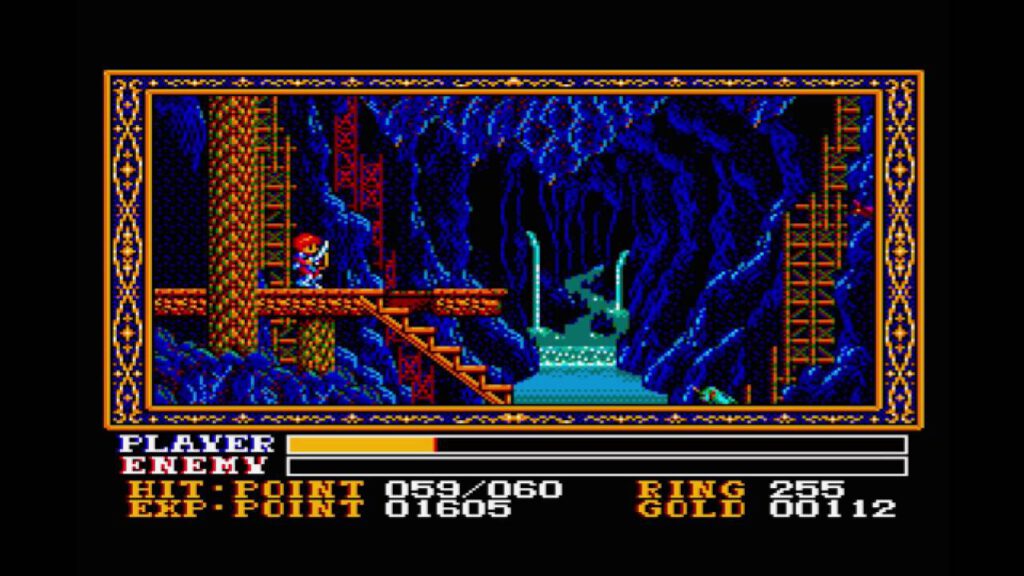
A solution for displaying damage

Way to get killed

Now we need a workaround for the fact that because we are unbeatable, the game is unfinishable. I have come up with one solution that can be developed inside the only method we have inspected so far. What if we kept track of a counter, which indicates the number of consecutive hits by an enemy on our party? That counter will increase every time we are hit, and when that counter reaches a certain number, our party members will become one hit kills as well. Then we could defend on each turn and let ourselves be hit until the counter reaches 10. We can reset the counter to 0 by hitting an enemy.

Now where can we store this counter? Since it needs to be persistent, we need to save it somewhere in memory. We have freed up the memory by simplifying the existing code, so I suggest to use the last free byte. This is on address #682a. We can load the value of this memory location into the A register and compare it with any number. So how can we compare?

To check whether a value is equal to another, we can use another bitwise operation, XOR. This checks each bit of both numbers, and is 1 if one of the two bits is 1, but only if the other one is 0. This is equivalent to the bit being 0 if both bits are the same. So the whole result of the XOR is only 0 if all bits are the same. So if we XOR two 8-bit numbers, the result is only 0 if those two numbers are the same.

Your new assignment is to alter the program so that:

  • If we are hit by an enemy:
    • No damage is done to us (we already implemented this).
    • A counter is increased each time we are hit by an enemy.
    • After 9 consecutive hits, we also become instant-death on each hit. So the 10th consecutive hit is the first deadly one.
  • If we hit an enemy:
    • The enemy is killed by doing damage equal to its HP (we already implemented this)
    • The counter is reset to 0.
  • Extra requirements
    • The counter starts at 0.
    • When the counter is increased, the text ”[counter] OF 10″ is shown. We don’t show the 0 DMGE text anymore.
    • When the counter is reset, the text “HITS RESET” is shown.
    • When we or the enemy are killed in one hit, the text ”FATAL” is shown. We don’t show the DMGE text anymore.

I want you to try to develop this first for yourself. It is not that hard, and all the ingredients are know to you. Then read my solution.

My Solution

My solution code

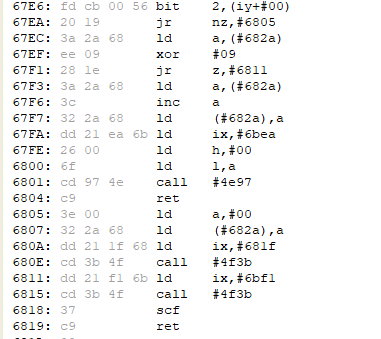
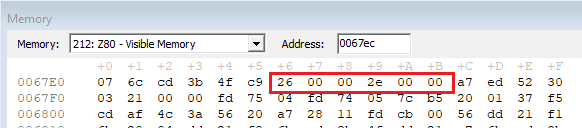
The code to implement the workaround is quite simple. The only thing to mention is the location of the text strings. In the old place, I removed the DMG! text, since we don’t need it anymore. I could not fit all the needed texts in here, I missed just one byte here. Since I had some bytes left empty because of the simplifying, I decided to put the text here.

The HITS RESET text
The other texts

Changing the Disk File

Now that we have altered the game to make us invincible, we want to make this cheat available to others as well. We could just share our save game and tell them to load in into BlueMSX, but what if someone wants to play the cheated game on a different emulator or even a real MSX? This can be achieved by changing the original disk file. And we are in luck here! The parts of the memory that we have seen and changed is present on the disk. It is not encoded or encrypted in any way. Machine code files on disk are just memory dumps! So we can find our original code and change it. We need a HEX editor for that. I used HxD, but any HEX editor will suffice.

Now open the disk 1 file of the game in the HEX editor. Let’s look for the original code. The original method started with the values: FD 6E 04 FD 66 05 A7 ED 52 30 so let’s look for those. We need to search for the HEX values. We will find one entry, at #88E6. So now type all the codes for your new code. Also don’t forget the altered texts to display on the screen.

So for my solution, from #88E6, I entered: FD CB 00 56 28 04 DD 21 07 6C CD 3B 4F C9 FD CB 00 56 20 19 3A 2A 68 EE 09 28 1E 3A 2A 68 3C 32 2A 68 DD 21 EA 6B 26 00 6F CD 97 4E C9 3E 00 32 2A 68 DD 21 1F 68 CD 3B 4F DD 21 F1 6B CD 3B 4F 37 C9 00 00 00 00 00 48 49 54 53 20 52 45 53 45 54 0A. The last value is on 8929. So you can select the values in the HEX editor and paste the new values. And from #8CEA to #8D01, I entered the following values for the other texts: 20 4F 46 20 31 30 0A 46 41 54 41 4C 21 00 00 00 00 00 00 00 00 00 00 00.

Now we can save the disk file and open it in BlueMSX. Restart the machine and start the game. You will see the altered code is there! So we have created a cheated version of the game for the world to enjoy!

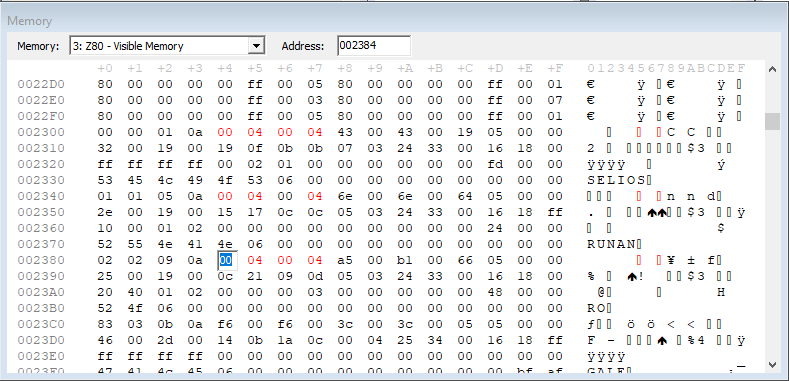
Also the start stats of the characters are in the disk file. I want you to find the stats on the disk (they will be like the memory from #2300) and cheat the game even more by setting the starting experience very high. By defeating one enemy, I want Selios to level up all the way to lvl99. Also, I want the game to start with max gold.

I have included a cheated .dsk file so you can see it work.

Part 7: We are invincible!

Are we hitting or being hit?

In the previous post, we saw that a set carrier flag is what communicates back to the calling code that the hit character has died. So we can greatly simplify the damage infliction method by just setting that flag and returning. But we want to have a better cheat and only have the hit character killed if it is a monster. But how do we determine whether it is a monster?

We see an instruction which determines this on address #6807 bit 2, (iy+00) what this method does is comparing bit number 2 (numbers will start counting from 0 and from the right) of the value of memory address iy+00 and setting the a register to 0 if this bit is 0 and to 1 if this bit is 1. The value of memory address iy+00 is the index of the character, as we have seen before. It will have a value of 0,1,2 or 3 for our party members, and a value of 4,5,6 or 7 for enemies. Now look at the binary representation of these numbers. The rightmost bit is bit number 0, then number 1 and the third bit is bit 2. So the third bit from the right is the one that is being checked in the instruction. You will see that it is 0 for all our friends, and 1 for the enemies. Did you ever wonder why in old games the size of the party is often 4 max? This might be one of the reasons! Now let’s have a look at a greatly simplified damage infliction method that discriminates between enemies and friends.

Simplified invincibility code infliction method

If you look at the method, you will see first the 3rd bit is checked, which indicates whether the character hit is an enemy or friend. Then we have a jump if the check result is 0, indicating friend. We just return, so nothing happens. If we are hitting an enemy, we will set the carrier flag, indicating death, and return. The rest of the method is now obsolete, and all memory up until #682A can be set to 00. This is not needed, but will give more clarity on it being memory not used.

Checking implications

Running the game indeed seems to do what we want it to. But it is wise at this moment to think about possible implications. What things are different when we return than before the change? How can these impact program execution?

  1. The enemy HP is not set to 00.
  2. We did not end up with HP in DE and damage in HL.
  3. We outputted a less text to the screen, we might get graphical issues.

Now if you are changing code to release to public, you should really debug beyond your change in multiple scenario’s to see whether the values that are different are used anywhere beyond your change. Also, intensive testing is needed to make sure the change did not break anything else. For now, we can just fight a few battles, and see whether the cheat works. Try damaging the enemies in different ways (hit, magic, item).

Now we have freed up a bit of memory, so there is space for some more logic. I want you to make the cheat a bit more sophisticated. We now just see the enemy die or we see nothing happening to us, but there is no information. I want to see the text: [HP] DMGE! when we are hitting an enemy. So if the enemy has, for example, 225 HP, the text should be 225 DMGE!. If we are hit, the text should be 0 DMGE! I want you to use as little memory as possible for this, because we will need all the bytes we can get for the assignment in the next post. It is advised that you first write down the statements as you want them on paper and then translate them all to the needed ‘opt-codes’.

It is good to mention that the program developers did not manually look up the codes for the statements that they needed. Also, they did not have to write the correct addresses into jump and call statements. They would write the instructions in a text file. Also, each line could have an extra label that they could address in a call or jump statement. Then they would use an ‘assembler’ to create the needed opt-codes, with all the right addresses in place. If you are a developer, it is a nice assignment to write your own Z80 machine code assembler in your program language of choice.

The cheat might work as we intended to, there is a big downside to this, however. The game will be unbeatable with the cheat in place. Think about it for a minute, why is this? Well, there are several moments in the game where you are intended to die. If you don’t, the game won’t advance. Very early in the game, for example, the owls are meant to kill you in the game, but if you are invincible, they won’t. So we need to think of a way around our invincibility. Maybe you can think of a way to have the enemies kill us in certain circumstances which can be programmed into our damage infliction method with relatively little code. I will explain one way I came up with in the next post and we will try to implement it.

Part 6: Inflicting Damage part 2

Clarifying the code

In the last post, we looked at the first part of the ‘Damage infliction’ method/subroutine. This name is one that I made up to make clear for myself what the method is for. Nowhere in the ‘disassembled’ code are these names to be found. And as you have probable noticed if you have debugged yourself, it is very easy to get lost in the code. Therefore, it is advisable to make notes about the code you have investigated. The disassembled code can be saved from the menu of the debugger (File -> Save disassembly) and then opened in a text editor. I have investigated the whole subroutine and here is the disassembled code with my notes.

The damage infliction subroutine with explanation

The first part, up until #67F7, we have discussed and are to calculate the new HP and correct if it is below 0. Now let’s talk about the rest of the method. I hope you know how binary numbers work, since we will be needing that to understand some of the used expressions.

The binary system

In short, each address is a value between 0 and 255 decimal, or 0 and #FF hexadecimal. In binary, these values are 0 and 11111111.

In our normal decimal system, the rightmost digit indicates the single numbers, the second digit the 10’s, then the 100’s, etc. In binary, the leftmost digit (which is called a ‘bit’) indicates the single numbers as well. But since possible values are only 0 and 1, the second bit indicates the number of 2’s. The third bit indicates the 4’s, then 8’s etc. And since the possible values of each bit are only 0 and 1, there can never be 2 of any bit. So there are never 2 4’s, but this would be one 8.

4 binary digits range from 0000 to 1111. 0000 is 0 in decimal. 1111 is 8+4+2+1 = 15 in decimal. This means there are 16 possible values. This is why these 4 bits are equivalent to 1 hex digit. A hex digit can range from 0 to F and also has 16 possible values.

DecimalBinaryHexadecimal
000000
100011
200102
300113
401004
501015
601106
701117
810008
910019
101010A
111011B
121100C
131101D
141110E
151111F
Decimal vs binary vs Hexadecimal

Now if you have a look online at the instructions that are available for arithmetic operations in the Z80, you will notice there are not a lot of options that you will recognize from normal math. We can add and subtract, but that is about it. There are some logical binary operations (called ‘bitwise operations’) that we can perform, however, and one of them we see in #67FB. To understand this, we need to think in binary, however.

In #67FA, the high part of the new HP is loaded into the A register. Since this is a number between 0 and 255 decimal (or 2 digits in hexadecimal), this number in binary can be represented as a 8 digit binary number. Then in #67FB, the value in the A register are being OR’d with the low part of the new HP. The OR is a bitwise operation which always operates on the A register and another number. It looks at each bit of both numbers (so first compares the first bit of both numbers, then the second etc) and results in a 1 if at least one of the both bits has a 1. So only if both are 0, the result will be 0. The resulting set of 8 bits represent a new number which will be loaded in to register A.

#67FC is then a conditional jump that jumps only if the contents of the A register is not 0. We know that the contents of the A register is the result of the OR, which is only 0 if both the high part and the low part of the HP were 0. So only if the HP as a whole is 0.

So only if the HP is zero, the statement at #67FE will be executed. The only thing this does is setting the Carrier flag. This is the same carrier flag we saw used to determine whether the resulting value was below 0. Here it is being set to determine whether the hit character has died. I found this out by experimenting and setting the flag manually by clicking it in the top of the CPU registers window.

The stack

The statement at #67FF push af is used to push the value of the AF register onto the STACK. This stack is the only window we haven’t used yet in the debugger. It is just a pile of values, globally available, on which you can PUSH values. Each new value will become the new top of the stack. Values can then be POP-ped back of the stack one at the time. And only the top of the stack can be POP-ped. So it is a last in-first out list.

At #6829 pop af, we POP the value back into the AF register from the stack. Why did we need to save the AF register value at #67FF? That is because the F part of that register is the state of all the flags. And because we have the Carrier flag indicating whether the target died, we need that restored into the carrier flag before we return to the calling code. Some logic to display hit and damage text has happened since, and so this flag has been reset a lot of times before we get here.

The remainder of the method is code to put the battle texts on the screen. First, one byte in memory, at address #2056 apparently indicates whether the hit is a big/bad blow or not. Some previous code where the damage was calculated apparently took care of this. Then for each text to display, the location of the text in memory is put into the IX register. If you would look at those addresses, you would see these texts indeed.

The battle texts in memory

One of the methods to display text apparently uses the HL register to show the damage being done. That register holds the HP, however. That is why the DE and HL values are being swapped just before the call to display.

In the next post, we will greatly simplify this damage infliction method to make ourselves invincible. If there only was a way to determine whether we are running the code because we are hitting an enemy or we are being hit. Well, there is! Inside the damage infliction method, in the part where the various texts are being displayed, there is a statement which determines whether an enemy or a player is being hit. This is needed because that determines whether the blow is BAD or BIG. Lookup the expression and figure out how this works. We will use it in the next post.

Part 5: Inflicting Damage

The CPU Registers

In the previous post we concluded by looking at some values in the CPU Registers. I will first explain shortly what they are and why they exists. We have seen a lot of memory values in the Z80 memory up until now. The processor is limited to what it can actually do with these memory values. It can read and write them and it can execute expressions interpreted by the values they contain. That is about it. The processor can’t do any calculations with these values directly. To do calculations (which it needs to do a lot), the values first need to be loaded into the CPU Registers. Then the processor can add, substract compare and do some other arithmetic operations with them. Most of the time, the result will be put back into the memory, making the register ready for the next arithmetic operation.

Each register has a special use and it is not advisable to use a register for the wrong operation. But we won’t go into much detail on that now. Now let’s see how the registers are used to calculate the new HP for the LYNXMAN when we hit him. The used registers are A, DE, HL, IX and IY. Register A is the Accumulator register, used for calculations. DE and HL are suitable for storing values and IX and IY are suitable for storing memory locations.

If you load the statefile from the previous post again and put a breakpoint at #658E and hit the first LYNXMAN we will see that the mentioned registers are filled with:

RegisterValueDescription
DE001FThe damage
IX2300The source character
(SELIOS)
IY2400The destination character
(LYNXMAN A)
The registers for inflicting damage

The registers A and HL are loaded with non-relevent data at this point.

If we look into the code, we see that first de contents of address iy+#04 and iy+#05 are loaded into the L and H parts of the HL register. Although values in memory are stored lowest significant number first, in the registers, it is the other way around, first the highest significant parts, as expected. So in this case, #2404 is loaded into the L part, and #2405 into the H part. Then the HL register contains the current HP of LYNXMAN A.

The code to update the HP after hitting

I don’t know what the and a expression is for at #67ec, so let’s ignore that for now. It does not seem to alter anything relevant anyway.

Then at #67ed is a substract statement sbc hl, de. This means the value of DE will be substracted from HL. Since HL contains the current HP and DE contains the damage, the result will be the new HP. So now HL contains the new HP.

Then at #67EF is a conditional jump: jr nc,#67f4. This states that if the carrier flag is not set (‘nc’ is short for ‘no carry’), we will jump to #67F4. This only skips the next statement at #67F1, but what is this carrier flag?

The Flag register

One of the CPU Register, the F register, is a special one. It contains information about the last operation that is performed. For example, the ‘Carrier’ part of the flag indicates whether the last operation resulted in a value that went out of range. This can happen if the resulting value is too large to be stored in the register, but can also happen if the resulting value will be below zero. Since the result can not be stored into the register, it will reset (like the mileage counter in a car) and the carrier flag will be set to indicate this.

Now if we imagine the damage being inflicted is bigger than the current HP of the hit character. Then the result of the subtraction in #67ED wont fit into the register and the result will be a very big value. Since this of course is not wanted functionality, the carrier flag is checked, and if it is set, the jump will not be performed and the next statement executed is at #67F1 ld hl,0000. So the HP will be set to 0.

After the optional resetting the HP to #0000, the following statements are to put the values of register HL back into memory again. The rest of the subroutine has a lot of logic for displaying inflicted damage and other things. But we will ignore that for now.

Changing the logic

Now let us change the logic to make every battle a one hit kill. We can achieve this by changing the logic to load a value of #0000 into register HL instead of the real HP stored in memory. So we will change the expressions at addresses #67E6 and #67E9. Now what do we want to put here? Instead of loading the register with the values from memory, we want to load it with the fixed value of #00. Now we need to look online for Z80 instructions set to find what the values are to put in memory. If, for example, you look at http://map.grauw.nl/resources/z80instr.php and search for ld h, you will see all expressions to load values into the h register.

The operation code for loading a fixed value into register H is apparently 26 followed by the amount. Since we want to put 00 in there, we need to put 26 and 00 at #67E6 and #67E7. The following address, #67E8, however, is also part of the old expression. So we need to erase that. We need to put 00 there too to make it a NOP statement.

The same goes for register L, the statement will be 2E followed by the value, so we will put that at #67E9 and #67EA, followed by a NOP again at #67EB.

Let’s enter all the values in the Memory window. This can only be done when the game is in debug mode.

Putting the changed values in memory

If we continue execution of the program and hit (or be hit) by an enemy, and we step until address #67E6 again, we will see the altered statements.

The new expressions

I swapped the loading of the L and H registers, but that had no impact on program execution. Also, we could have put the second statement at #67E8 and #67E9, and put a nop at #67EA, which would make it a bit more readable.

Now if we play the game again, we see indeed every hit is a one hit kill. The downside, of course, is that also when we are being hit by an enemy, we are swooned in one hit. So this is not really a usable cheat.

An alert reader, ‘Benjamin’, pointed out to me that there is a much easier way to change the logic with the same end result that every hit will kill. Actually, there are many more options to do this. Look at the code again and try to come up with a solution. One answer can be found in the comments. In the next blogpost, we will investigate the rest of the subroutine. Then in the post after that we will re-implement the whole method which will require some more thinking and logic reasoning.

Part 4: Debugging Code

The Disassembly

In this post, we will look at some actual code. But first the answers to the questions from the previous post:

  • What is a bit? How many values can a bit contain?
    • The most elementary piece of data. Can contain 0 or 1.
  • What is a byte? How many values can a byte contain?
    • 8 bits. 256 values (0 to 255)
  • How many values can a hex digit contain? How many digits does a byte have in hex?
    • 16 values. 2 hex digits in a byte (as we’ve seen a lot already in the memory window)
  • Why is 16 the magic number in the memory window?
    • Because that is how many values one digit can contain. So it is like ’10’ in the decimal system. It allows data to be presented neatly with all addresses ending on the same digit to be displayed below each other.

Until now, we have looked at the Z80 memory only as a holder of ‘passive’ program data. This data can also be interpreted as executable instructions. In fact, the Z80 does not differentiate between executable instructions and program data. This means the developers have to keep track of what pieces of memory are instructions and what pieces are memory. If they get mixed up, it will lead to catastrophic program failures. To have a look at those instructions, open the ‘Disassembly’ window.

The Disassembly window

As you can see, the data here is presented as instructions. The memory addresses are the same as before, and the content are thus the same too. For example, use menu item Debug -> Go To to go to memory address #2300 (the data of SELIOS) and you can see that that data can be interpreted as instructions too. But this code you never want to execute of course, since they are nonsense! It just goes to show that there is no distinction between program data and instructions. Developers had to take real care not to jump to non-instructions data, and also not to change memory that actually contains instructions!

As you can see on address #2300, the value 00 is a nop instruction. This means: do nothing. At #2302 you see that the values 01 0a 0a which are on address #2302, #2303 and #2304 actually translate to the instruction: ld bc, #0a0a. For now we will not go into what that means.

Some real code

Now let’s go look at some actual program code. I have figured out at address #657E is code that is executed when hitting an enemy. So let’s go there and put a breakpoint there. Just click in the line before the address.

A breakpoint on 657E

Go back to the game (unpause if needed) and find some enemies. If you hit the enemy, or the enemy hits you, you will see the program breaks on that statement, because a yellow arrow is shown there. Now first go back to the game (do not unpause) and press F8 to quicksave the computer state. This will become in handy later on. It is really easy to loose track of where you are, and pressing F7 to quickload state again is the way to start over. When we have done that, we can safely step through the program execution, but first a little explanation about program flow.

Program flow

When a program is executed, the processor is always running the current expression at an address. It executes the expression and then moves to the next expression. Most expressions take up more than one byte of memory, but the processor will automatically move to the next statement. So after executing the expression at #657E, the active expression will be the one at #6582. In the debugger you can click on Step Over (or press F10) to do this.

Some expressions control program flow. The most used are:

call address: This will call a subroutine at the address, so the next expression to execute is at that address. It will return when a ret is executed.

ret: Execution will go back to the statement which is first after the last call.

jp address: Execution will jump to the address. Execution origin is forgotten, so not possible to return with ret. Most jp instructions are conditional, meaning that the jump will only take place if conditions are met.

jr offset: Like jp, but execution will go forward offset bytes in memory. So jr 10 will jump forward 10 bytes.

If you look at address #6582, you can see there is a call statement there. Here there are two debugging options. If F10 is pressed, the execution will ‘step over’ the call. This means that everything that is inside the call will be executed at once until a ret is found and execution will commence on address #6585.

If F11 is pressed, however, the execution will ‘step into’ the call. So it will move to the address being called and stop there. So press F11 for now (if you already pressed F10 to step over, just go back to the game, reload the machine state and start over).

Jumped into call #6571

As we can see, the execution is indeed as expected at address #6571. Also what we can see is that the origin address #6582 is added to the call stack. See the Callstack window to see this happen. This is the way the processor keeps track of all call executions. There may be other call expressions inside the called subroutine before we get to a ret. And there may be other call expressions inside those subroutines. We can see this on address #6576 if we step into this routine again, another entry will be added to the call stack.

So whenever a call is executed, this is added to the top of the call stack. Whenever a ret is executed, the last entry is taken from the top of the call stack and the execution is returned to the statement following the original call statement. In the call stack, it is clear that also non-call statements are present. I currently do not know why they are there, so I ignore them. It may be a bug in BlueMSX displaying the call stack incorrect.

You can now step out of the last called function by pressing SHIFT F11. This will continue execution until the ret is found in the current subroutine. Then it will break again on the expression following the call. The last entry will be removed from the call stack.

If you want to resume execution of the program again, press F5. The program will then run until a breakpoint is hit again, or the game is pause with F9.

Now load the stagefile I have included above and hit the first enemy. If you did not delete your breakpoint at #657E , the program will break again there. Run the code until addres #658E. You can either put a breakpoint here and press F5, run with F10 until you get here, or hilight the address line and choose in the menu Debug -> Run To Cursor (or press shift F10). Look at another window, the CPU registers. We will not discuss them now, but you might recognize some of the values that are stored there. Two of them, we discussed before. The third one can be recognized if I tell you that the damage that will be done in this hit is 29.

The CPU Registers

Now, with RO, hit one of the enemies. Let the program break on #657E. Now step with F10 until you are on #6588. This is a conditional jp instruction. When we hit with SELIOS before, the condition was false, and we stepped to the next instruction. Now with RO, however, we will see that if we press F10, we will actually jump to the address mentioned in the jp statement: jp c, #67b6. So the condition is true apparantly this time. Now go back to the game and press F9 to continue. Can you spot what is different from the SELIOS hit? You can always load back the statefile and repeat the process.

If you answered the questions above, you have some clues on what the code does. In the next post, we will look into how this actually works and we will even modify some of the logic in our first attempt to make an altered version of the game! So the fun is about to begin!

Part 3: The Personalities

Where are we?

In the previous post, I suggested you to find Ro’s HP and change the (max) HP and MP for each of the characters. Using the current value of 177 (dec), we can convert this online to a B1 (hex). Using an ASCII character table, we see the corresponding character is a ±. Searching for this character, we find a candidate on the second result (address #2384). This B1 is followed by a 00 (We will call this value ’00B1′ from now on. remember, in the Z80 the values are reversed). If you look further, you see that this is followed by another 00B1 (hex). So there another 177 (dec) is stored. So it would make sense if these values are the HP and the max HP. Then we see a 00A5. If you convert this online, you will see that this is 165 in dec. If you look in the game, that is exactly RO’s current MP. Then another 00B1, which must be his max MP.

To find the other characters, I suggest you make the Memory window as wide so that you can see 16 values next to each other. This means above it, you see +0 +1 up until +F. This makes sense, because then below address #2380 is address #2390, and below #2381 is address #2391.

Our characters’ stats in memory

As you can see, there is a nice pattern in the data of all our characters. The HP for SELIOS is at address #2304. We find his name from address #2330. RUNAN’s data is exactly four rows below this, so HP at #2344 and name at #2370. Note that even GALE is in memory already, although he is not a member of the party yet.

In fact, the data for the characters start at #2300. Each character has 40(hex), which is 64(dec) bytes of data. So the data for the second character starts at #2300+40=#2340(hex). The data for the third character is #2300+80=#2380(hex) etc.

The first byte of each character is the index of the character. As you can see, the index of GALE is not 03 as you might expect, but 83. This 8 indicates he is not a party member yet. Change this to 03 and GALE is a member of the party too! You will have to fight some monsters, for example, to see this.

The current HP, for example is always 4 bytes further than the start address of that character. That can be calculated as [StartAddress]+4.

The name of the character is always 3 lines below the start address. This can be calculated as [StartAddress]+30. These calculations may not make much sense yet, but we will see them being used a lot when we will look into the program logic in future blogs.

Now if we want to change the (max) HP and MP to the 1024 as was the assignment in the previous post, you will have to alter the values like in the following illustration. You will have to fight some enemies or sleep somewhere to see the new values.

Our characters in memory with 1024 (max) HP and MP

Our Enemies

Now I want you to find some enemies and then in the fight, start debugging again. Look at the memory just beyond the stats of the characters.

The monsters’ statistics

During a fight, you can see all the monsters stats are in memory. Do you recognize the pattern? It is exactly the same as from the characters! The monster stats start from #2400, instead of #2300, but the rest is the same. Each monster has 40(hex) bytes of data. Each HP is at startaddress+4. The name for each monster is at startaddress+30. The index for each monster counts from 4. The fourth monster, in my case, has an index of 87, meaning this one is not present.

This data layout is not only beautiful, it plays a vital role in a lot of game logic which is executed during a fight. This will become clear if we look into the actual game logic. We will start doing that from the next post. For some parts in these posts it will be helpful if you understand the difference between decimal, hex and binary. I suggest you study online what they mean and why they are used, if you don’t know already. You will have a clear understanding if you can answer these questions:

  • What is a bit? How many values can a bit contain?
  • What is a byte? How many values can a byte contain?
  • How many values can a hex digit contain? How many digits does a byte have in hex?
  • Why is 16 the magic number in the memory window?

Part 2: The Z80 memory

The Debugger

In this post, I assume you have BlueMSX installed with the game Dragonslayer 6 running. Also, I assume you have spent some time playing and getting to know the game. Some of the BlueMSX commands come in handy, especially (quick) saving and loading the machine state and speeding up to make grinding a lot more bearable. Also, with F9, the game can be paused. That is handy if you want to take a break, but it also makes debugging possible. Debugging means looking into the machine state and see what is going on. This is the most important way of finding errors (‘bugs’) in code. Okay so let’s start the game and at any moment pause the game with F9 and in the BlueMSX menu, choose Tools->Debugger. An second application opens up with a lot of information. Don’t be scared with all you see here, we will address most of these parts one at a time during this blog series.

The BlueMSX debugger

Now the only window we will use here is the Memory window. So go ahead and make this bigger. In here the total ‘Visible Memory’ of the Z80 is shown. This is the memory of the Z80 at the moment we pressed F9. Each piece you see is actually a number between 0 and 255. It is shown in ‘hexadecimal ‘ format. For now, it is not really important to know how this works. There is, again, a lot of information online so go ahead and research if you want to know more. There are also a lot of online converters to convert between hexadecimal and decimal, and you will need to use one of those. If you click on one of the values, you can see the address of that value. So starting from the top left, the addresses are 00000, 00001, 00002 etc. Address 00000c is the first memory position with a value different than 00, c3. If you click on that c3, you also see the address shown in the address box. We will write the addresses from now on in the format #address. We will omit trailing zeroes.

The address 00000c

In the previous post, I promised to make you rich. So let’s do that. In the Memory window, we see all the memory of the Z80. So the amount of money we have at that moment should be in there too. If you want to follow the search hands-on, I suggest you open the following state file (unzip it and load it in BlueMSX with ALT-F7).

If you load this state, you can see we have 3063 gold. To find this in memory, we need to convert this to hexadecimal (from now on ‘hex’). If you convert this, you see this is bf7 in hex. Just like with decimal values, you can add trailing zeroes as you wish. Since the memory positions all contain 2 digits, we need to add one zero and the value to find is 0bf7. This means it will be present as 2 values: one of 0b and one of f7. One would assume to find the 0b first and de F7 second, but for reasons I do not know (yet), the values in the Z80 are swapped. So the least significant value will be first and it will be present as f7 first and then a 0b.

Searching for ASCII characters

To find these values in BlueMSX is a bit of a hassle. Until now, it is not possible to search for the hex values. The only format you can search for is the ASCII representation of the values. If you look at the right side of the Memory window, you see all sorts of characters. If you scroll through the memory, you can also recognize words there. These characters are a set of 256, which are standardized by ASCII. So each number between 0 and 255 represent a character. If you look for a table online, you see for example that the number 21(hex) represents a ! sign. So if we want to find a hex value in BlueMSX, we need to look for the ASCII representation of those values.

https://www.rapidtables.com/code/text/ascii-table.html

And there is another catch. Some characters, like the first set of characters (00 to 20 hex) and 7f hex, are special characters like ‘ESCape’ and ‘DELete’. Since these can’t be typed into the search box, it is not possible to search for those. So you well need to try a few times with different values to get values that you can find.

We want to find the values f7 0b. The 0b is not a searchable character, but the f7 is. So there is nothing to it but looking for all f7 values and see which one is followed by a 0b value. So looking in an ASCII table online, we see that it is represented by a ÷ token. So let’s look for that and see whether we can find one that is followed by a 0b. Press CTRL F and paste the ÷ sign from the online table. Press F3 to cycle through the results. After about 20 times you will find a candidate. If you click the f7, in the box above you see the address is #208c.

To check whether the amount of gold is indeed stored here in memory, go back to the game, press F9 and do something to change the amount of gold. The easiest is to buy or sell something in a store. Then press F9 again, go back to the debugger, and check the same memory address again (you can enter 208c in the address box and press enter to go to that address).

We see that indeed the amount of gold has changed. BlueMSX even shows the changed values since last debugging session in red. So it is quite safe to assume this is the memory location of the gold. If you want to be totally sure, check the new hex values with the new amount of gold in game.

Memory has changed to changed gold amount

Gimme the money!

Now we know where the gold is stored, it is easy to make ourselves rich. We know #208c is the lowest significant and #208d is the higher significant address. We can put ff in both of these to give us the maximum value represented by 2 addresses, 65535. But since in game you can own bigger amounts than that, also the #208e will be part of the gold at even higher significance. Putting ff in here too will net your gold at over 16 million. So go ahead and click on the memory values and enter the values you want. Press F9 again in the game and see…. nothing!

We have the money updated in memory, but because since this was not a normal way to obtain money, the game has not redrawn the new gold amount to the screen. So do anything that changes your amount of gold the normal way (in a store, for example), and see yourself rich!

I’m rich!

Now as an excercise, I suggest you use RO’s current HP value to find where this is stored in memory. One hint: The HP can be bigger than 255, so it will be followed by a 00.

Then give alle our 3 party members 1024 HP, MAX HP, MP and MAX MP. What do you need to do to make these values visible? Write down the memory addresses you need to change these values. Do you see any pattern?

Now that you know all memory addresses, you can load your own last saved state file and alter the same values there.

In the next post, we will look a bit more into the the character and enemy statistics and make the fighting a bit easier.

Part 1: Hello Z80!

Introduction

When I was a child, my father bought us our first computer. It was an Acorn Atom. I remember it had no storage, so when we wanted to play a game, we had to enter the code for the game from a printed listing in a magazine or a book and run the game. Errors were tackled by a checksum which was printed next to each line. The computer had 1k of memory. After saving up some money, we could buy a memory expansion. That was just another chip. This chip had to be soldered on the old one (with the exception of one pin, which had to be soldered somewhere else, with a wire). After that our memory was doubled to 2k!

The next computer that came into our house was an MSX. I think it was a Toshiba HX-10 MSX 1. We loved the games on that platform. In the beginning it was mostly games like Road Fighter, Athletic Land and Penguin Adventure and Yie-Ar Kung-Fu, but later the games got better, especially the Konami ones, with games like Knightmare, Maze of Galious and Metal Gear. That last one we could play because we got an MSX2.

Our first MSX

Later, we bought a Philips MSX with a disk-drive, so we could play the newer generation of JRPG’s. At this time, games like Dragonslayer 4, 6, Ys series and XAK series came out by new game developers like Falcom and MicroCabin. At first, we played these games completely in Japanese, not knowing what was going on, but later, custom English translations appeared.

Gameplay shot of YS3 on MSX 2

Next to playing games, i also got interested in software development. I learned coding my first instructions in MSX basic. First the famous “10 print “jasper”; 20 goto 10″ to fill the screen with my name, but later i did more with graphics in the graphical screens. I created some simple games like a slot machine, but never got further than that. The BASIC language was just too slow to create real responsive games. I wanted to learn Machine Code. In fact, that was a kind of a fascination for me at the time. I could not comprehend how people could come up with these ‘poke’ commands which would enable a cheat in a game! Unfortunately, for me, it was just too complicated to get into. Also, I was about 18 years old at the time so other interests were stepping up.

Second attempt

Now we are 25 years later. And of those 25 years I have worked 20 years as a software developer. All these years I have worked in ‘higher level’ languages, which greatly abstract what the computer really needs to do to get those instructions done. I know deep under the hood, still everything is accomplished by executing Machine Code commands, very similar to the commands in the MSX at the time. So I decided to try to have another go at figuring out how this works after all these years. The heart of the MSX computers is the Z80 microprocessor, made originally by Zilog. In fact, I named my ‘company’ (I work independently in the IT, but needed a company name for legal registration) “Z80 IT” as a tribute to the processor that started it all. The processor itself is very well documented online, so I will not elaborate any further.

A Z80 processor by Zilog. Most MSX computers used processors from other manufacturers.

For this little project, I decided to take a game as a starting point, and see whether I could figure out how things work by debugging. I always think these hands-on approaches work better that reading books and starting from scratch. Also, with the emulators nowadays it is a lot easier to emulate and debug an MSX machine with an executing game. I decided to take one of my favorite games “Dragonslayer 6” as the subject. I use “BlueMSX” as the emulator. I suggest you download the emulator and the game now, if you don’t have it already, and play the game for a few hours. Use ALT-F7 and ALT-F8 to save and load your current machine state often. And when you’re done, safe the state once more.

The emulator can be found here:

http://bluemsx.msxblue.com/download.html

The game can be found here:

https://download.file-hunter.com/Games/MSX2/DSK/

Download: Dragon Slayer VI – The Legend of Heroes (1990)(Falcom)(en)

In the next blog, I will show how the debugger works, how values are stored and we will change our first memory value to cheat ourselves rich!

© 2025 Z80 IT

Thema gemaakt door Anders NorenBoven ↑